When linking a file into Revit, which positioning option should I choose?
There are 6 positioning options for Revit Links.
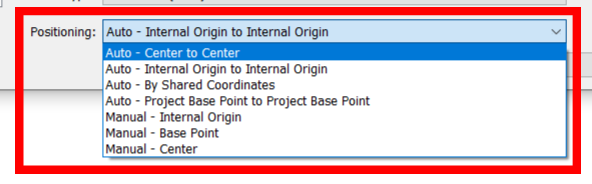
There are only 4 positioning options for Point Cloud Links.

Below are detailed descriptions of each option. You will need to choose the appropriate option for your project.
Auto – Center to Center: places the center of the links’ bounding box at the center of your models’ bounding box. If most of the model is not visible, this center point may not be visible in the current view. To make the point visible in the current view, Zoom your View to Fit the screen (ZF). This function centers the view on the Revit model.
Auto – Internal Origin to Internal Origin (Origin to Origin): Revit places the links’ world origin (0,0,0) point, at the Revit project origin that can be seen as a project base point in the site plan.
- Revit Link
Revit will place the project according to the (0,0,0) of the link project to the (0,0,0) of the project linking into. Revit 2020 and later calls this point the ‘Internal Origin’
- Point Cloud
If your Project North is rotated, Revit will also rotate the point cloud so that the point cloud’s north direction (0,1,0) maps to the current Project North. It makes sense to use this option if your point cloud is sampled with respect to the known point and known direction in your model or on your site. Note that if you use the “Origin to Origin” option to insert a point cloud that is stored with respect to a geographical/surveyor coordinate system, it is likely that the cloud will display very far away from the rest of the model.
Auto – By Shared Coordinates:
- Revit Link
If shared coordinates are set up, the links will retain an established connection relative to the coordinates. Typically this option is not the first option you should choose as the coordinate either need to be manually placed or acquired/published.
- Point Cloud
Revit assumes that the coordinates in the point cloud file are specified in the shared coordinate system used in your model. As a result, the point cloud origin will be placed at the origin of the shared coordinates that can be accessed through the Survey Base Point. The point cloud will be oriented so that the north direction in the cloud file (0,1,0) will be mapped to the True North of the Revit model.
Note: By default, project origin and shared (survey) origin are in the same location. When you link a point cloud file, the end result of selecting Auto – Origin to Origin and Auto – By Shared Coordinates will be identical.
Auto – Project Base Point to Project Base Point:
- Revit Link Only
Should the Revit files have a project base point that differs from the internal origin point; for example; the elevation have been raised and the twist to true north, the Revit link will import to those values according to each other.
BONUS
Point Cloud Only:
Auto – Origin to Last Placed: Revit places the next imported point cloud consistently with the previously imported point cloud. This option becomes enabled after you insert one point cloud. You can move this first cloud, for example, to align it properly with the model elements. If you have additional point clouds created on the same site and in the same coordinate system as the first one, it is recommended to use this option to insert the additional point clouds. New point clouds will then be correctly placed with respect to the first one.: Revit places the next imported point cloud consistently with the previously imported point cloud. You can move this first cloud, for example, to align it properly with the model elements. If you have additional point clouds created on the same site and in the same coordinate system as the first one, it is recommended to use this option to insert the additional point clouds. New point clouds will then be correctly placed with respect to the first one.
Download PDF – KB-210121-Link Positioning Options
