What do each of the options do when linking \ importing CAD files into Revit?
When linking or importing you have the following choices.
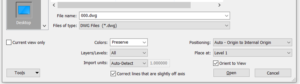
• Current view only
o If you want the CAD file to be visible in more than one view, do not check this option. When you choose current view only the lines in the CAD file are drawn with “detail” lines which are view specific. If you current view only is unchecked, the lines are drawn with “model” lines which are displayed any time those lines are within a views view range. Model lines are also displayed in 3D views.
• Colors
o Your choices are: Invert, Preserve, Black and White. With preserve the colors displayed match those of the CAD file. Since CAD typically has a black background and Revit typically has a white background, many find the result is hard to read. To improve the readability the “invert” option. Dark colors become lighter, and light colors become darker. The black and white option makes all the lines black.
• Layers/Level
o There are 3 options: All, Visible or Specify. With the All option, all layers are imported\linked regardless of their visibility in the CAD file. You can always adjust visibility after so this is probably the most widely used option. With the visible option, only those layers visible in the cad file are imported\linked. In other words, any layer that was off or frozen in CAD is not available in Revit. It’s not even on the list to turn it back on later. The Specify option will prompt you with a dialog box so you can choose the layers you want to import / link.
• Import units
o I’ve rarely needed to use anything other than Auto-Detect. If you import / link and the scale of the file is incorrect determine the units of the file and choose the appropriate option.
• Correct lines that are slightly off axis.
o The option will straighten out lines that are less than 0.1 degree from horizontal or vertical. This is selected by default and good to keep on except in the case of site plans that you will want to have the very small skewed lines showing.
• Positioning
o This option needs a whole article by itself. Until then we suggest starting with “Auto – Origin to Origin. Here’s a link to Autodesk’s knowledge base about the topic:
o Click here to be taken to the Autodesk article
• Place at:
o This option is not available when current view only is check. When you import the CAD as “model” lines you need to choose to what Revit level the CAD will be located at.
Download PDF – KB-201229-Options when linking importing CAD into Revit
