How do I add \ use a shared parameter in my Revit Project file?
Shared parameters are created and stored in a separate shared parameters file that lives outside your Revit project. To add a shared parameter to your project you start by creating a new “project parameter”. During that process you need to specify you are creating a shared parameter, select the shared parameters file and then select the desired parameter.
Background
Shared parameters allow you to use the same parameter in more than one project or family. This is important if you are linking files together to create consolidated schedules or exporting to databases. Most offices maintain a “master” shared parameters file for everyone in the office to use.
Preparation
You will need to have the shared parameters file that you want to import from. If you do not, you can export a shared parameter from a Revit file to a shared parameter file of your choosing; reference article: KB-2101-Shared Parameters Transfer.
Steps To Add a Shared Parameter To Your Project
- From the Manage Tab > Shared Parameters

- Browse to the location of the text file provided.
- This links that particular shared parameter file to your project.
- The parameter needed now needs to be added to the project.
- From the Manage Tab now choose Project Parameters.
- Click Add
- Select Shared Parameter > Select
- Select the parameter group from the dropdown list
- Select the parameter from the list and click OK
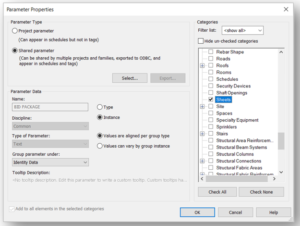
- Set the parameters data and category required for that parameter.
- (Revit category, type vs. instance, values per group type or instance, group parameter under,)
Download PDF – KB-210106-Shared Parameters Import
